|
|
|
Build your
own
MORTAR RACK
All consumer aerial shell kits contain up to 40 shells, yet usually include no more than 2 mortars to launch them from. That means you run out, put in a shell, light it, run back, wait for it to shoot up, then repeat the process. Even with beautiful shells, this might get a little old after awhile, especially if you have lots of shells. In professional displays, they pyrotechnicians make us of "racks"; wooden frames that contain multiple mortar tubes. Using this combined with quickmatch (or any fuse), you can ignite several shells in quick succession, making a very exciting barrage of effects in the sky. The instructions below will tell you how to build a 20-mortar shell rack of your own.
Materials
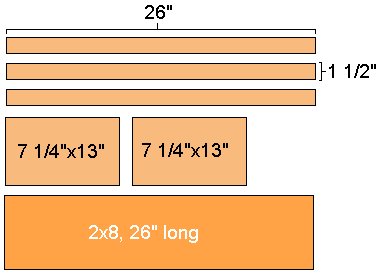
| -¾" plywood cut into five pieces as shown on the right -2x8, 26" long -2" drill bit -2 3/8" drill bit -wood screws -20 feet of HDPE pipe, cut into 1 foot lengths -drill press -electric saw |
 |
*NOTE ON USE OF HDPE: High Density Polyethylene pipe is the ONLY type you can use for this project. Never use anything such as ABS and PVC. Why? ABS and PVC are "brittle" pipes that are susceptible to large explosions (such as those from shells). These pipes are capable of withstanding the burst from the lift charge (that shoots the shell up), but if for some reason the shell got lodged in the pipe on the way up, the burst charge would shatter the pipe and send razor-sharp pieces in all directions. This would end your happy 4th of July rather quickly. HDPE is much more dense, and would shred into harmless strips of plastic if a shell exploded inside.
HDPE is available at some plumbing supply stores. I bought mine from a company called Performance Pipe in Vancouver, Washington. It costs approximately $.73 per foot, which would make the total amount of pipe for this project less than $15. The type is 2" DR-11. You can also just ask what kind of pipe they sell to people for launching consumer firework shells, and they'll probably know what you're talking about.
 |
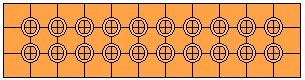
Begin with your 26" long 2x8 (who knows WHY they call it that...). This will be the base of the rack. Measure out and draw 10 lines across it. The first line should be 1½" from the end, and each line after that should be 2½" apart. The 10th line should be 1½" from the opposite end. Now draw 2 lines lengthwise across the piece of wood. My calculator tells me that they should be exactly 2.41666666666666666666666666666666667" from the end and each other. Seriously, though...since the board is 7¼" wide, it's kind of tough to divide it by 3. Just mark them at a little less than 2½". Don't worry. This isn't rocket surgery or brain science... |
| If you haven't already guessed, you'll be drilling a hole at
each point where the lines intersect. Read carefully, here, this
might get a little confusing...First, put the 2" drill bit into the
drill press. Drill a hole at each point where the lines cross.
Only drill about ¾" into the wood. The tiny drill bit within
the larger one is what actually goes in where the lines cross, and the
larger one makes a bigger hole around it. DO NOT remove the wooden
"plug left standing in the middle of the hole you
drilled.
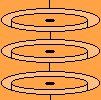
Now put the 23/8" drill bit into the drill press, and drill over each hole again. The tiny guidance bit in the center will go through the same hole that the last one made, but the larger bit will widen the outer hole. Still with me? What you're doing is making a hole to ram the pipe in to. See the lower picture on the right. It's a side view look at the holes you just drilled. |
|
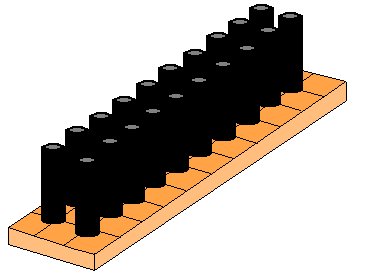 |
Before putting in the tubes, use a screwdriver to scrape out
sawdust and wood chips from the holes.
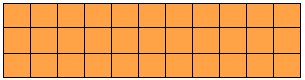
Set a tube on top of a hole, and begin pounding it in with a hammer. It shouldn't go in too easily. The tight fit is necessary so the gases from the lift charge don't escape and fail to lift the shell to an appropriate altitude. |
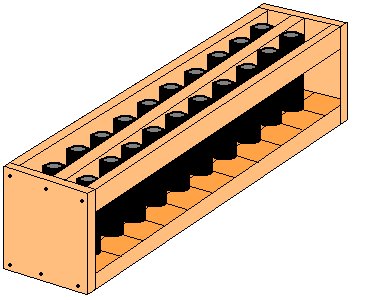
| Now add the sides and the dividers. Put the side
pieces against the end of the base and attached them with nails or
screws. As shown in the picture, take the 3 long divider strips and
place them between and on the sides of the tubes. The only real
purpose these serve is as a means to straighten out the tubes and as a
place to set quick match for lighting multiple shells.
To launch 10 (or even 20) shells, place a long piece of quick match along the dividers and hot glue it down. Put a 4" leader of Visco safety fuse in the end of the quickmatch. Use a knife to make slits in the quick match paper wherever there's a tube. Insert the desired number of shells, slide their fuses into the holes in the quick match. Light the fuse and run. The quick match will ignite all of the shell fuses instantaneously, and the shells will fire in quick succession. WARNING: I highly recommend you stabilize this thing somehow. You could attach two 1' pieces of 2x4 lengthwise across the end (to increase it's surface area on the ground), lean sandbags against it, or bury the thing almost to the top in dirt. |
 |
Please email me if you have any questions or comments regarding the construction of this rack. In the future I may consider building these and selling them online.